REVIEW · KUTA
Bali: Silver Jewelry Making Class in Seminyak and Legian
Book on Viator →Operated by Kay Family Bali · Bookable on Viator
Silver jewelry in Bali, with your hands on it. In a small workshop in Seminyak and Legian, you learn how Balinese silversmiths turn fresh silver into wearable art, and you get to make your own ring, earrings, or pendant. I especially like the friendly, patient instruction and the fact you work with real silver (about 5 grams) instead of watching from the sidelines. One possible drawback: you’re working with a limited silver amount, so bigger or more complex designs may not be possible.
The class runs about 2 hours (plan 2–3) and is built around a hands-on, step-by-step process, plus sanding and polishing so your finished piece looks clean. If you’re staying around Kuta/Seminyak, the pickup option and the central meeting point at Family Silver Class Legian make it easy to fit into a day. It’s also a private activity for your group, so you’re not stuck waiting your turn with strangers.
In This Review
- Quick Highlights
- A Practical Jewelry Workshop in Seminyak and Legian
- Where it’s based (and what that means for your schedule)
- What You Can Make: Ring, Earrings, or Pendant
- Typical finished items
- Why this matters (and helps you pick a design)
- Price and Value: Why $12.22 Can Make Sense
- How to judge if it’s worth it for you
- How the Class Flows: From Design Choice to Finished Shine
- 1) Pick your design before you start
- 2) Melting and shaping the silver
- 3) Forming your piece into its final shape
- 4) Finishing: sanding and polishing
- 5) You take it home
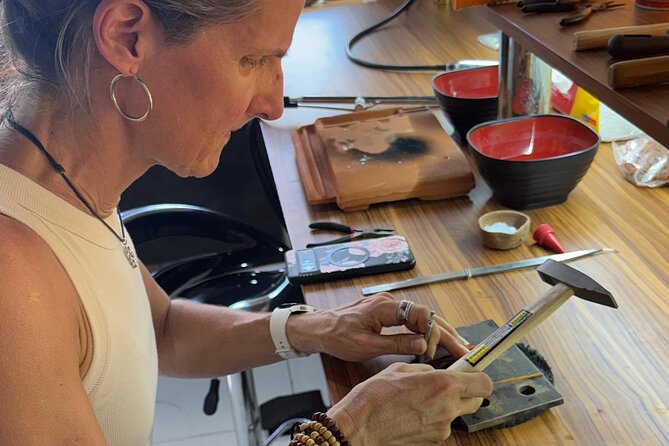
- The Hands-On Part: Tools, Heat, and Patient Guidance
- What to expect when it gets technical
- Is This Workshop Good for Families and First-Timers?
- Where You’ll Stay: Matching the Workshop to Your Bali Day
- Quick tips for timing
- Tips to Get a Better Result (Without Stress)
- Who Should Book This Silver Jewelry Class
- Should You Book It?
- FAQ
- FAQ
- What is included in the Bali silver jewelry making class?
- How long does the class take?
- What jewelry can I make?
- Do I get to choose a design?
- Is pickup available?
- Is this a private class?
- Can I cancel and get a full refund?
Quick Highlights
- Hands-on silver making: you create a ring, earrings, or pendant with guided steps instead of just observing
- Real silver to take home: you use about 5 grams of pure Indonesian silver
- English instruction: an English local instructor helps you follow the process
- Safety-focused workshop vibe: staff guide you through tools and hot steps
- Design choice first: you pick your piece from a selection shown before you start
A Practical Jewelry Workshop in Seminyak and Legian
Bali is full of art shops. This one is different because you’re not just buying something pretty. You’re making it.
This silver jewelry class is set up like a mini craft studio in the Seminyak/Legian area. The goal is simple: you’ll learn the basics of silver jewelry making in Bali, then you’ll produce your own piece—commonly a ring, pair of earrings, or a pendant—with help from Balinese silversmiths and an English local instructor.
What makes it a smart use of time is the balance. You get enough structure to feel confident, but you also get personal choice. People tend to leave with a keepsake that isn’t just a souvenir magnet. It’s something you actually shaped, smoothed, and finished.
You can also read our reviews of more tours and experiences in Kuta


Where it’s based (and what that means for your schedule)
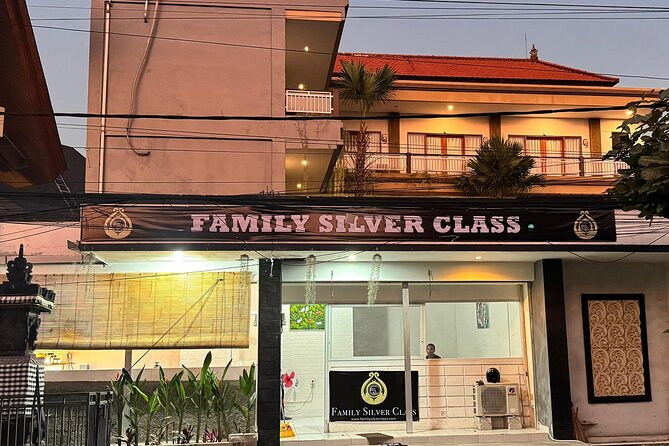
The meeting point is Family Silver Class Legian on Jl. Campuhan II, Seminyak, Kec. Kuta, Kabupaten Badung, Bali 80361. The activity ends back at the meeting point.
The workshop notes that the location you’ll use is adjusted based on where you are—so if you’re bouncing around Kuta, Seminyak, or Legian, it’s built to reduce time wasted finding the place. Also, it’s described as near public transportation, and service animals are allowed.
If you’re trying to plan your day, I’d treat it like a half-day activity even though it’s officially around 2 hours. Between checking in, choosing a design, and finishing (including sanding and polishing), 2–3 hours is the realistic expectation.
What You Can Make: Ring, Earrings, or Pendant
The class is built around one core promise: you’ll create your own silver piece.
Before tools start flying, you’re guided through the design process. You can typically choose what you want to make—there’s a selection of designs you look at before you start. From there, the team helps you shape your choice into a workable final item.
Typical finished items
Based on the class details and how it’s described, you can aim for:
- A silver ring
- A pair of earrings
- A pendant (or similar small jewelry piece)
The amount of metal is part of the planning. The workshop says you’ll work with 5–7 grams of silver, while the inclusions specify 5 grams of pure Indonesian silver. Either way, you’re not working with a huge sheet of silver—so think “one custom piece” rather than “full jewelry set.”
Why this matters (and helps you pick a design)
If you like detailed, delicate designs, you’ll want to pick something that fits the workshop’s metal and time limits. Ask for guidance when you choose. The staff are described as patient and safety-conscious, and that’s usually when they’ll steer you toward a design that will actually come out the way you want.


Price and Value: Why $12.22 Can Make Sense
At $12.22 per person, this class sits in the “surprisingly good value” category—if you judge it the right way.
Here’s what you’re paying for, based on what’s included:
- 5 grams of pure Indonesian silver
- English local instructor
- Sanding and polishing
That means the price isn’t just labor for a demo. You’re taking home a piece of actual silver made in the workshop. You’re also getting the finishing steps so it’s wearable as a holiday keepsake.
What’s not included is personal expenses, which is typical for any workshop (think snacks, extra buys, or anything beyond the planned class).
How to judge if it’s worth it for you
This is worth your money if you want:
- a hands-on Bali activity (not another “watch and leave” tour)
- a custom souvenir you’ll actually wear
- instruction in a small setting
It might not be worth it if you’re looking for:
- a long, intensive metalsmithing course
- a class where you design something fully from scratch with no guidance
In this class, your creativity is real, but it works within a workshop system designed for a 2-hour session.
How the Class Flows: From Design Choice to Finished Shine
The workshop moves in a logical rhythm, and it’s designed to keep you from feeling lost. People often praise how friendly and patient the staff are, and that matters because you’re working with steps that involve heat and tools.
Here’s the typical flow of what you can expect during the class.
1) Pick your design before you start
You’ll choose the look of your piece from a selection shown before the work begins. This is one of the most underrated parts of the experience—because once you commit to a design, the rest of the steps follow.
If you’re making a ring, you’ll typically decide on the style first, then the team helps with the form and sizing process. For earrings or a pendant, you’re choosing a shape and style that’s appropriate for the silver amount you’ll use.
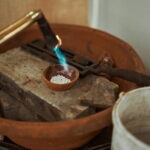
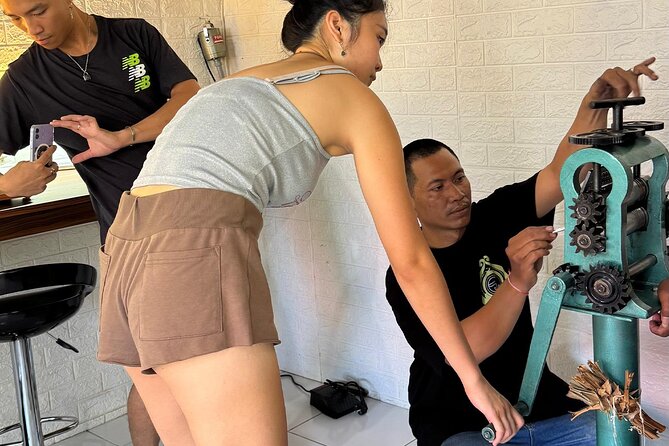
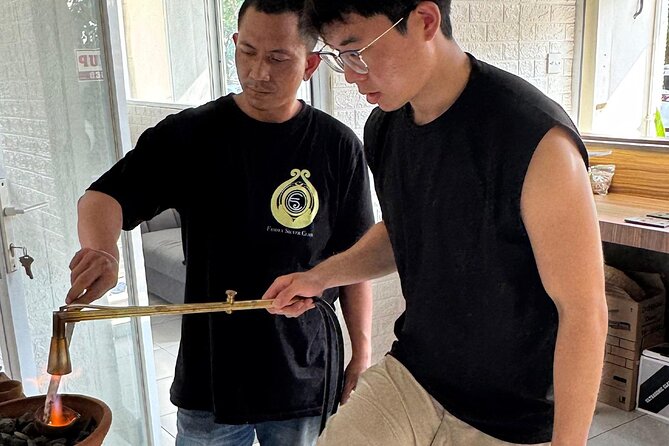
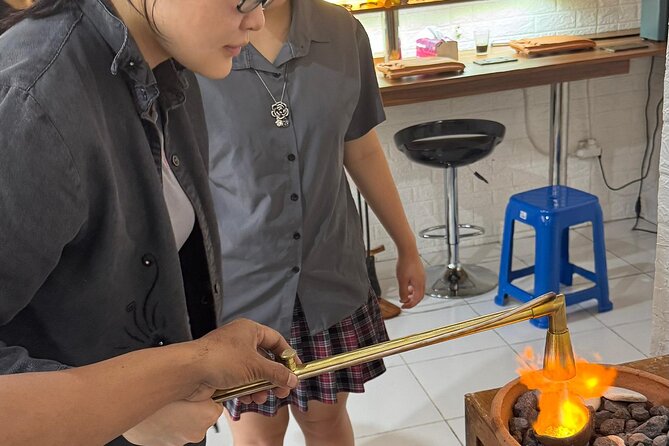
2) Melting and shaping the silver
The class includes the hands-on steps of transforming the metal. One of the highlights described is being included in the melting-down process of the silver. You then move into shaping steps like rolling the silver to the right thickness (with guidance).
This is where the experience becomes memorable fast. It’s also the portion where safety matters most, which is why you’ll want to listen closely and follow the instructor’s pace.
3) Forming your piece into its final shape
After shaping, you’ll work toward the ring/earring/pendant form. The workshop’s whole point is that you participate in making, not just supervising yourself.
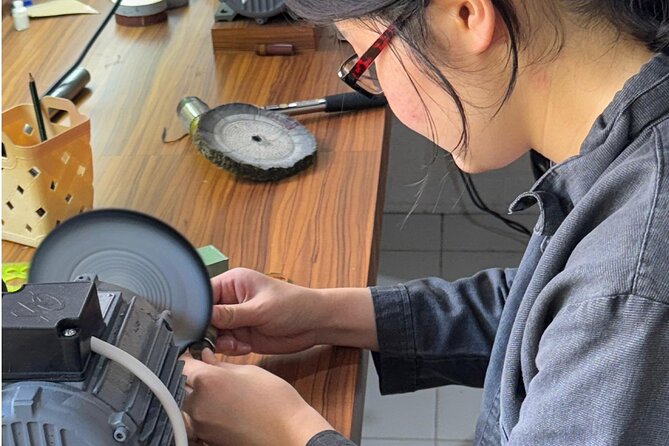
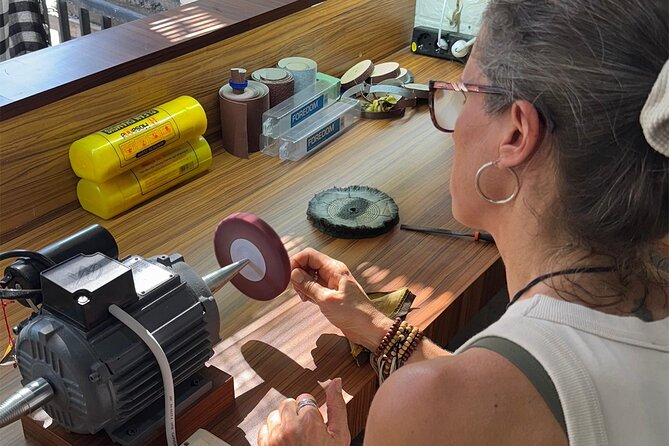
4) Finishing: sanding and polishing
This is included: sanding and polishing. This finishing stage is where your piece goes from “crafted” to “presentable.” It’s also where your hands get involved in the final look, so you can see your piece change from rough to smooth.
The class keeps time moving, but the polished finish is specifically part of what you paid for—so don’t treat it as optional or rushed.
5) You take it home
Once finished, your piece becomes your souvenir. This is a big reason people recommend the workshop: it’s personal in a way photos don’t capture.
The Hands-On Part: Tools, Heat, and Patient Guidance
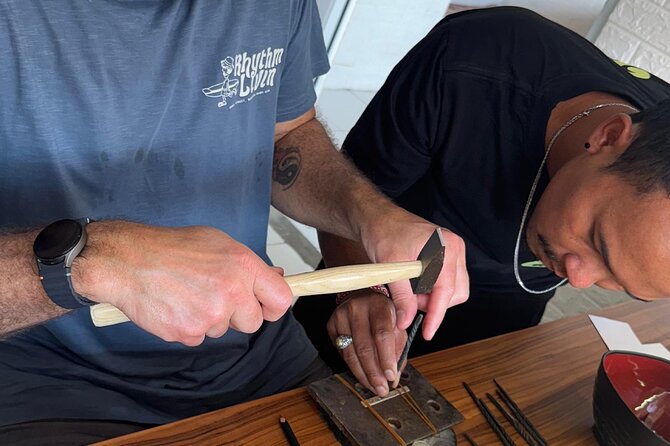
If you’re nervous about doing craft work, you can relax—but still stay alert.
The workshop is described as interactive and hands-on, and the instruction is repeatedly praised as friendly, helpful, and patient. There’s also a strong emphasis on making sure kids and adults stay safe during the process.
What to expect when it gets technical
At some point, you’ll likely work through steps that feel unfamiliar if you’ve never handled metals like this. That’s normal. The best move is to:
- ask questions right away when you’re unsure
- follow the safety rules without trying to speed up
- take your time on the shaping and finishing steps, because that’s where errors show
One theme in the feedback is that the staff were not just supervising—they were actively helping you produce a real result you’re proud to wear.
Is This Workshop Good for Families and First-Timers?
Yes, for a lot of people, and here’s why.
A family experience with two adults and two children is specifically called out as a hit. The key points: the class was interactive, the staff made sure everyone was safe and enjoying the process, and the kids were excited about how much hands-on work they did.
That doesn’t mean it’s “for everyone.” It’s still a workshop that involves tools and careful steps. But if your group includes kids who can handle structured activities for a couple of hours, this can be a fun choice.
For first-timers, the class is also a good match because:
- you choose from a design selection
- you get guided steps (instead of open-ended crafting)
- the instructor support is available in English
Where You’ll Stay: Matching the Workshop to Your Bali Day
This class is in the Seminyak/Legian zone, but the listing mentions Kuta in the area details. Practically, that’s good news because you can often fit it into a day without crossing the whole island.
The activity ends back at the meeting point, which keeps things simple. Pickup is offered, and the location may be adjusted based on where you are, which helps if you’re staying farther inside Seminyak or closer to Legian.
Quick tips for timing
If your Bali day is packed, I’d schedule this when you’re not rushing. The experience is about making something carefully. Plan for time to:
- get checked in
- choose your design
- participate in each step without feeling hurried
Tips to Get a Better Result (Without Stress)
You’ll get the best experience if you treat it like a craft session, not just a tour stop.
Here are a few practical tips based on how the class is structured and what’s included:
- Pick a design you like and one that fits the piece size. Since you’re using a limited silver amount, simpler forms often polish up nicer.
- Pay attention during the melting and shaping steps. You don’t need to memorize everything, but listening makes your piece easier to form.
- Plan on sanding and polishing time. That finishing stage is where your piece looks professionally finished.
- Wear clothes that are comfortable for workshop work. Even if you’re not doing heavy labor, you’ll be close to tools and metal dust.
- If you’re with kids, set expectations: they’ll get hands-on and guided help, but they still need to follow safety instructions.
Who Should Book This Silver Jewelry Class
This workshop is best if you want a Bali activity that’s:
- Hands-on and creative
- Likely to produce a wearable keepsake
- Structured enough for beginners
- Short enough to fit into a busy itinerary
You’d especially enjoy it if you like the idea of learning how silver jewelry is made in Bali, then turning that learning into something you can keep.
You might skip it if you’re looking for:
- a long, deep technical metalsmithing training
- a class focused more on shopping than making
- a fully custom-from-scratch design process
Should You Book It?
If your goal is a meaningful, personal souvenir—and you don’t mind getting a bit hands-on—this is an easy yes.
For around $12.22, you’re not just paying for entertainment. You’re getting real silver, an English-speaking instructor, and the finishing work that makes your piece look ready to wear. The repeated themes in the experience style are patience, friendliness, and a strong focus on safety, including for families.
If you’re in Seminyak/Legian and you have a spare couple of hours, this is exactly the kind of Bali activity that turns your trip into a story you can actually hold.
FAQ
FAQ
What is included in the Bali silver jewelry making class?
The class includes 5 grams of pure Indonesian silver, an English local instructor, and sanding and polishing.
How long does the class take?
The experience is listed as about 2 hours, and the workshop is also described as lasting 2–3 hours. Plan for roughly 2–3 hours.
What jewelry can I make?
You can create your own silver jewelry such as a ring, pair of earrings, or a pendant, with guidance from the silversmiths.
Do I get to choose a design?
Yes. You pick your ring or jewelry design from a selection shown prior to starting.
Is pickup available?
Pickup is offered. The workshop also notes that the location used may be adjusted based on where you are.
Is this a private class?
Yes. It’s described as a private activity, meaning only your group participates.
Can I cancel and get a full refund?
Free cancellation is available. You can cancel up to 24 hours in advance for a full refund. If you cancel less than 24 hours before the start time, the amount paid is not refunded.