REVIEW · UBUD
Ubud Bali Silver Jewelry Class
Book on Viator →Operated by Taro Village Experience · Bookable on Viator
Silver, fire, and a finished piece in two hours. In a traditional silver-making village near Ubud, you design a ring, bracelet, or earrings and walk out with something real, not a souvenir. I like the hands-on pace and the way instructors such as Bima, Komang, and Diah guide you step by step.
You also get a clear beginner workflow, from design choices through burn, cut, clean, and finish. Take-home jewelry is the point here, and you make one item design per person (you do not just watch).
One thing to plan for: the class includes a limited amount of silver, and extra grams and stones can add cost if you want more detail or gemstones.
In This Review
- Key Things You’ll Notice Right Away
- A Traditional Ubud Silver Studio You Can Fit Into Any Day
- Price and What You Get for the $50
- Picking Your Ring, Bracelet, Earrings, or Lion Shape
- Inside the Class: Design, Burn, Cut, Clean, Finish
- The Small-Group Difference (and Why It Shows)
- Transfers From Ubud: Worth It If You Don’t Want to Fight Traffic
- A Few Logistics Details That Save You Frustration
- Wear something that works for hands-on metalwork
- Bring cash for gemstones and extra silver
- One person, one item design
- Can You Make More Than One Thing?
- How to Get a Better Final Piece (Not Just a Finished Piece)
- Choose a design you can finish confidently
- Be realistic about stones
- Ask for help early
- Who This Class Is Best For
- Should You Book the Ubud Bali Silver Jewelry Class?
- FAQ
- What kinds of jewelry can I make in this Ubud silver class?
- How long does the class take?
- What is included in the price?
- Are gemstones included?
- Can I bring my own silver or gemstones?
- Is the class group size limited?
Key Things You’ll Notice Right Away
- Small-group setting (max 8 travelers) with more attention while you work.
- Choose your piece from ring, bracelet, lion, or earrings before you start.
- You do the steps: design, burn, cut, clean, and finish your own silver item.
- Coffee or tea plus bottled water keeps the 2-hour session comfortable.
- Extra silver costs per gram, and stones cost extra, so budget beyond the base price.
A Traditional Ubud Silver Studio You Can Fit Into Any Day
Ubud is famous for experiences, but a silver jewelry class feels different because you’re not just shopping or posing. You’re learning a real craft in a working setting near Ubud, and you end up with an actual piece of jewelry you created.
The session runs about 2 hours, and it starts and ends back at the meeting point in Tegallalang (Ubud MK2 Silver Class, Jl. Raya Tegallalang, Sapat, Tegallalang, Gianyar). If you’re doing other Ubud-area stops, this timing is friendly: it’s long enough to make something meaningful, but short enough not to eat your whole day.
One reason this works well in real life is schedule flexibility. There are multiple class times daily, so you’re less likely to get stuck with one awkward slot.
You can also read our reviews of more tours and experiences in Ubud


Price and What You Get for the $50
The base price is $50 per person, which covers the core class experience and a starter allotment of silver. For many people, that’s the value sweet spot: you pay for instruction plus the materials framework, then you decide how fancy you want to go.
Here’s the practical breakdown you should keep in mind:
- You make one item design per person.
- Silver use is limited: if you use more than 4 grams, you pay an additional fee of IDR 75,000 per gram.
- Gemstones are not included. If you want stones, you’ll pay stone prices ranging from IDR 100k to IDR 500k.
- You’ll also need to consider that adding additional silver and/or stones typically means more cash on hand.
A small but important detail: silver rations can’t be shared between people. So if you’re hoping to combine silver to make two items, that plan won’t work automatically. You can still create a great result, but you’ll want to make your choices early so you don’t get surprised halfway through.
Also note the practical instruction: it’s best to prepare some cash if you want to buy gemstones or additional silver. The class is hands-on, and cash-based add-ons are usually the simplest way to handle upgrades.
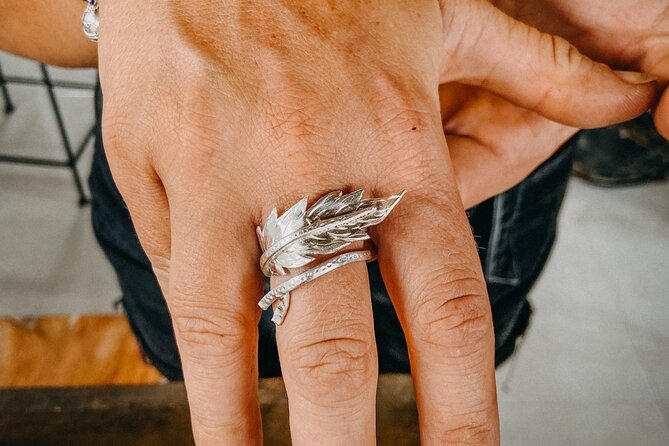
Picking Your Ring, Bracelet, Earrings, or Lion Shape
Before you start physically working, you select what you’ll make. Your options include:
- ring
- bracelet
- lion
- earrings
This matters more than it sounds. Different shapes take different amounts of time and shaping effort, and you’re working inside a compact 2-hour window. If you choose a very detailed concept, you may spend more time on finishing and less time on polishing. If you want something wearable immediately, start with a design that looks good even after a first pass.
I like that the class does not force you into one template. You’re creating your own design, but with beginner-friendly guidance so you’re not left guessing.
One thing I’d also plan for: the materials policy says you cannot bring silver and gemstones from outside. That keeps the process consistent and simple, but it also means you should not arrive with a shopping list of stones expecting to swap them in.
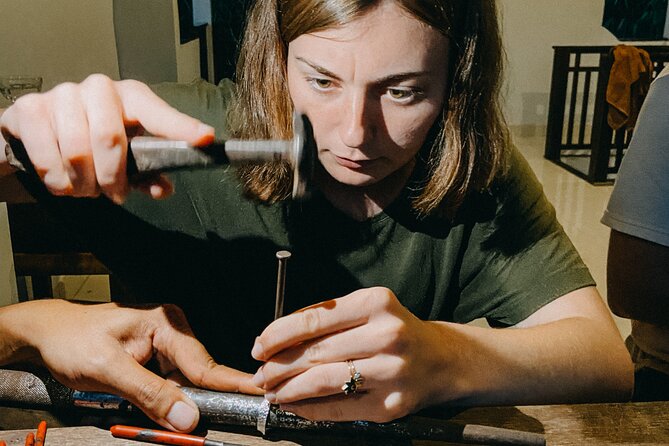
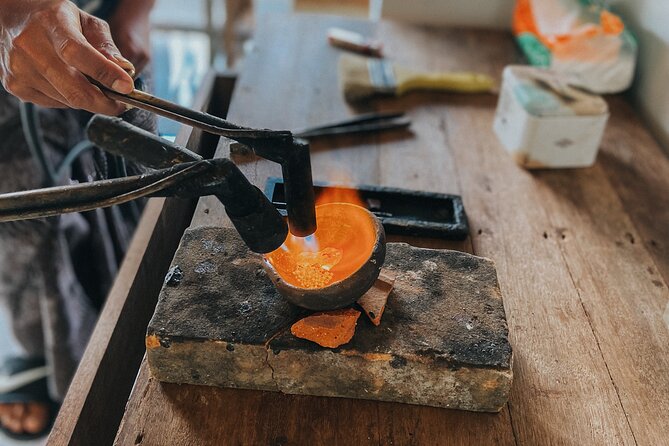
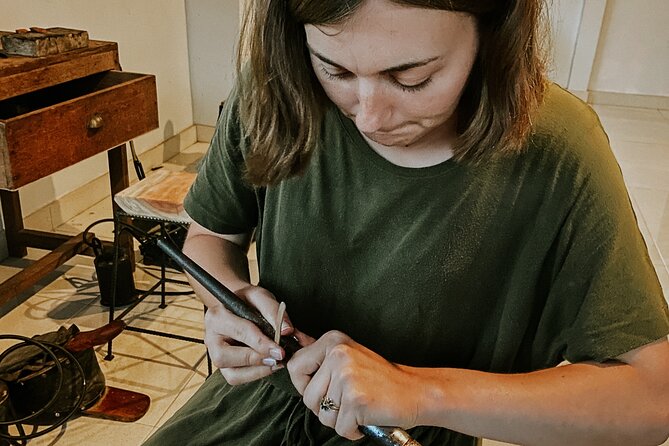
Inside the Class: Design, Burn, Cut, Clean, Finish
The learning format is the heart of this experience. This isn’t a quick demonstration followed by a token craft. You actually go through the steps, with an experienced teacher showing you the basics as you work.
The sequence is built around what they teach:
- Design your piece
- Burn (a core part of shaping the metal)
- Cut into the needed shape
- Clean and refine
- Finish so it’s presentable
It’s a smart approach for beginners because it breaks the craft into chunks. Instead of being overwhelmed by the whole job at once, you focus on one step, then move forward when you understand what comes next.
Many people love this part because the instruction is practical and patient. In the feedback, the repeated theme is that the teachers help you through every stage and keep you moving forward without making you feel rushed. If you’re nervous about doing anything metal-related, you’ll probably find that support makes the whole thing feel doable.
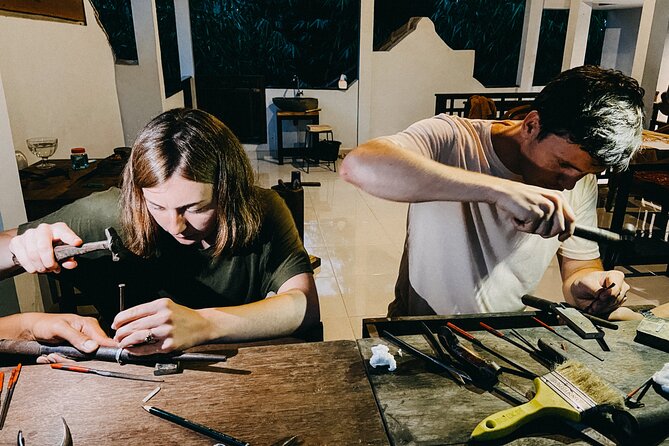
The Small-Group Difference (and Why It Shows)
This class caps at 8 people. That size matters. In a group that small, you can ask questions while you’re mid-step, not after everything is done. You’re also more likely to get help with the specific challenge you’re facing, like getting a clean cut line or making your shape look balanced.
In the feedback, people repeatedly mention how kind and patient the instructors are. Names you may hear include Bima, Komang, and Diah, and that personal touch is part of why the experience feels memorable.
You’ll also typically get basic refreshments: coffee or tea, plus bottled water. It’s not a big café vibe, but it keeps you comfortable while you’re concentrating on handwork.


Transfers From Ubud: Worth It If You Don’t Want to Fight Traffic
The class is in Tegallalang, so getting there can be an easy win if you choose transfers from Ubud. The tour offer includes the option for transfers, which can save you time and hassle when you’re bouncing around Ubud between activities.
If you’re already in Tegallalang or close by, you might be fine without transfers. But if you’re staying in the busier Ubud center, transfers usually make the day smoother, especially when you’re trying to hit a specific class time.
A Few Logistics Details That Save You Frustration
Small things can make or break a hands-on class. Here are the ones that matter based on the experience info and what people described:
Wear something that works for hands-on metalwork
You’ll be working at a studio setting, so closed-toe footwear is smart. One review mentioned being told to use indoor shoes, so there may be a moment where you switch footwear once you arrive. Plan for that by bringing socks you’re comfortable working in.
Bring cash for gemstones and extra silver
Gemstones and additional silver are not bundled into the base price. Stones can run from IDR 100k to IDR 500k, and extra silver costs IDR 75,000 per gram if you go over the included amount.
If you want a stone, decide your budget before you start so you’re not doing math under pressure while holding hot tools.
One person, one item design
The class includes one person making one item design, and you cannot share silver rations with other people. If you and your partner want matching sets, plan each person’s design separately.
Can You Make More Than One Thing?
The default is one item per person in the class. Still, there’s room for flexibility depending on how efficiently you work and how much silver you use.
One piece of feedback notes that using less silver helped someone make more than one ring, then pay a little extra to finish the idea. That lines up with the structure: the included silver is limited, and going beyond it triggers per-gram fees.
So if you’re hoping to create two items, your best move is to talk with the teacher early, choose a simpler second item idea, and keep an eye on silver usage.
How to Get a Better Final Piece (Not Just a Finished Piece)
This class is beginner-friendly, but the quality of your outcome depends on how you approach a few choices.
Choose a design you can finish confidently
Big, complex details can be tempting. But with a 2-hour timeline, simpler designs often finish better and wear better.
Be realistic about stones
Gemstones add color and personality, but they also add cost. If you’re budget-conscious, consider either skipping stones or using one stone placement where it will look best.
Ask for help early
When the teacher is actively guiding you, ask questions while you’re still at the step where the correction is easy. Waiting until the final finishing stage can mean less ability to redo what would have been a quick fix earlier.
Who This Class Is Best For
This is a great choice if you:
- want a hands-on Balinese craft experience in Ubud without a full-day commitment
- like the idea of learning a real process and not just buying something
- enjoy making gifts for yourself or someone back home
It’s also a smart fit for couples and friends. The small group setting keeps it social, while the instruction stays personal.
If you hate paying for add-ons during an activity, you’ll want to set a strict budget in advance. The base class is clear, but silver grams and gemstones can change the total.
Should You Book the Ubud Bali Silver Jewelry Class?
I think you should book it if you want something more personal than a standard souvenir stop. For the money, you get a true skill lesson and the best part: you take home a piece you designed yourself.
Choose this class especially if you like structure. The sequence of design, burn, cut, clean, and finish keeps beginners from feeling lost, and the max-8 format helps you get enough attention to make progress.
Skip or rethink if you’re trying to avoid any extra spending beyond the base price. Between per-gram silver fees and gemstone costs, your final total depends on how ambitious your design is. If you go in with a plan and some cash ready, it’s a memorable, practical Ubud activity.
FAQ
What kinds of jewelry can I make in this Ubud silver class?
You can make a ring, bracelet, lion, or earrings. The class teaches beginners and you take your finished silver piece home.
How long does the class take?
The class runs about 2 hours.
What is included in the price?
The class includes coffee and/or tea, bottled water, and instruction by an experienced teacher. One person can make one item design, and silver is provided with a limit (if you use more than 4 grams, extra fees apply).
Are gemstones included?
No. Stones are an additional cost, with stone prices listed from IDR 100k to IDR 500k. You should prepare cash if you want to buy gemstones.
Can I bring my own silver or gemstones?
No. You are not allowed to bring silver and gemstones materials from outside.
Is the class group size limited?
Yes. This activity has a maximum of 8 travelers. Confirmation is received at the time of booking.